How to connect to IRC
-
HexChat Setup Guide for GTANet
-
Go to the official HexChat download page:
https://hexchat.github.io/downloads.html -
Choose the 32‑bit or 64‑bit installer depending on your system.
You can check this under Settings → System → About on Windows. -
After downloading and installing HexChat, launch the client.
-
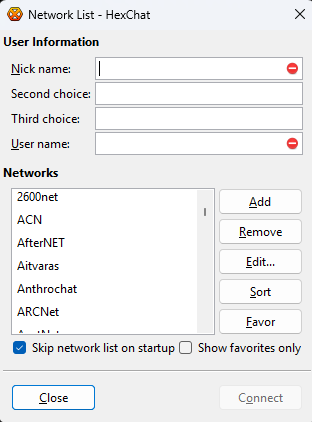
Enter your desired Nick name (usually your account name).
The second and third nickname fields are fallback names in case your main nickname is already in use. -
Username:
This can be anything, but if you register an IRC account later, you will have a permanent username and can use multiple nicknames with it.
Your full IRC identity looks like this:
nickname!username@host-
In the Network List window, press Add
Type "GTANet" and hit Enter

-
Now let "GTANet" as selected, then hit Edit...
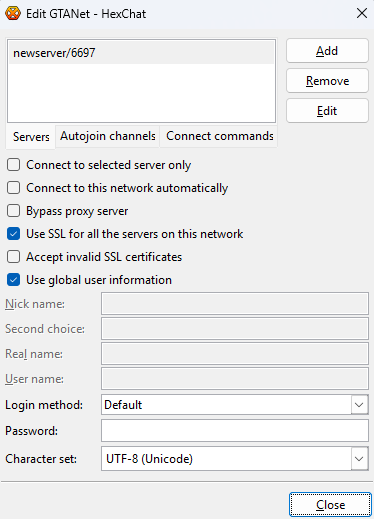
- Click the default server entry (e.g., newserver/6667 or newserver/6697 ) and replace it with:
comet.uk.eu.gtanet.com/6697-> press Enter (Pressing Enter is required to save the server.)
-
Tick Connect to selected server only.
Tick Connect to this network automatically. -
Login Method: Choose NickServ (/msg NickServ + password) only if you will register an account on GTANet later.
-
At the top, open the Autojoin Channels tab.
-
Press Add next to it.
-
Type #gto.talk and press Enter.
(Pressing Enter is required to save the channel.) -
Press Close
-
Back in the Network List window, you may tick Skip network list on startup if you prefer.
You can always reopen it via HexChat → Network List. -
Press Connect, or simply close and reopen HexChat — it will automatically connect to GTANet and join #gto.talk.
Additional Notes
HexChat uses the IRC protocol, which predates modern chat platforms like MSN, Skype, and Discord.
It’s a 25–30+ year‑old technology. HexChat does not include a built‑in dark mode, but you can enable one using configuration files.Dark Mode Setup
- Open the Start Menu.
- Type %APPDATA% and press Enter.
- Open the HexChat folder.
- Create or edit colors.conf using Notepad.
-> Paste the content from: https://pastebin.com/qiyQFvMx
-> Save
-> Close file. - Create or edit pevents.conf using Notepad.
-> Paste the content from: https://pastebin.com/CEwXaYSm
-> Save
-> Close file. - Restart HexChat to apply the changes.
If you did everything good, you'll see something like this:

You can still go to Settings -> Preferences to set a lot of things such as logging
If you need timestamp for e.g. 2026.02.10. 10:11:00:
Interface -> Appearance->Timestamp:(%Y.%m.%d. %H:%M:%S)If you need logging:
Chatting -> Logging:
You can tick "Enable logging of conversations to disk"
Log filename:D://HexChat/logs/%Y-%m-%d/%n-%c.log(NOTE: This is my personal pattern, so you have to change the start of it. I save my logs to D drive. This pattern will save logs into separate files for each day.)
Timestamp in logfiles:(%Y.%m.%d. %H:%M:%S)If you insist to save logs, I recommend you to NOT save logs on an SSD as it will continously write on the drive and will weaken it.
-